
This guide will walk you through installation notes, troubleshooting tips, and special features for installing your VHEDIA head unit into a Toyota Hilux SR5 2011-2015.
Installation Video
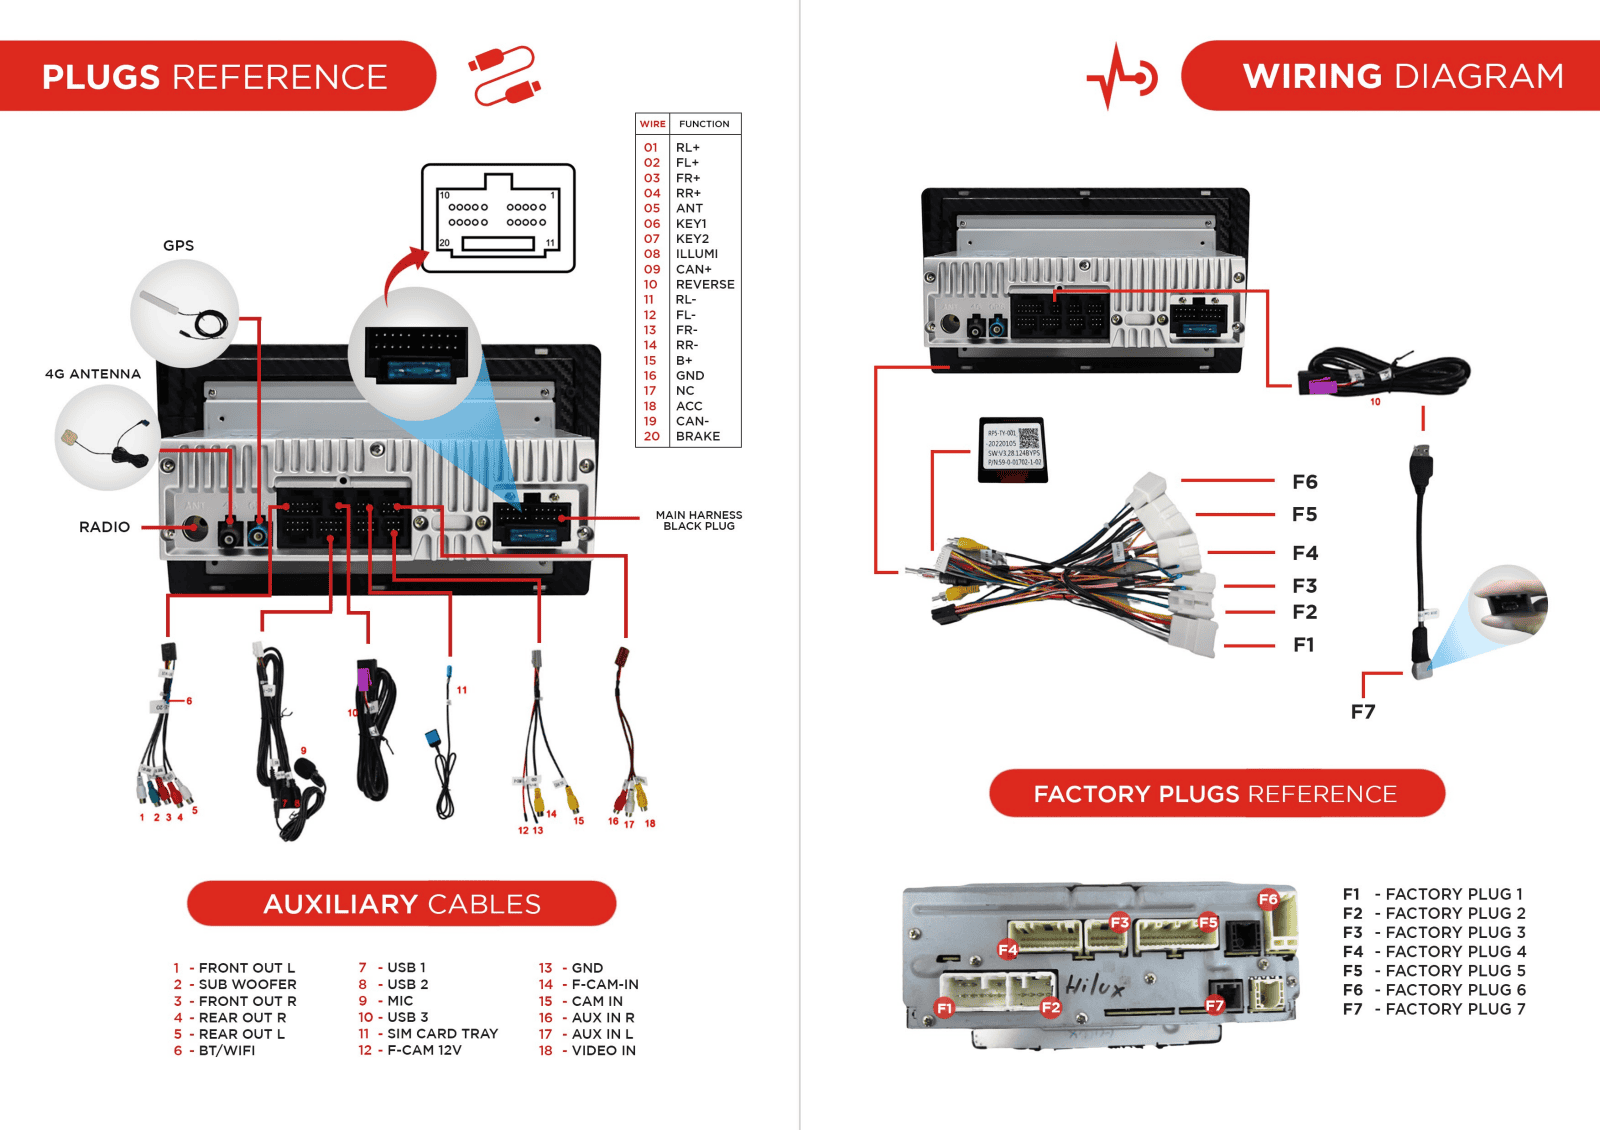
Which Wire Goes Where
Common Issues & Fixes
Factory Reverse Camera and Steering Wheel Controls Not Working
Just need to make sure that correct CANBUS setting is selected.
Settings > Car Settings > Factory Settings > Enter 126 for password > CAN BUS > CAN Box settings > Choose 2.TOYOTA/CAMRY/RAV4(Simple) Toyota > Select OK
Settings > Car Infotainment > About Device > Tap the gear icon in the top right corner of the screen > Enter 8878 for passcode > CAN Type > Choose number 3. Toyota > Tap Save and the head unit will reboot
Connecting the Factory Reverse Camera
If you're installing a VHEDIA head unit into your Toyota Hilux SR5 (2011–2015) and planning to retain the factory reverse camera, this guide will walk you through connecting it properly — especially if your vehicle uses the 4-pin reverse camera plug.
Some Hilux SR5 models from 2011 to 2015 come with a 4-pin plug for the reverse camera. If this is the case, you’ll need to use the extra 4-pin harness included in your VHEDIA kit to adapt the camera signal to the new head unit.
The 4-pin harness has three cables that need to be wired correctly to the 6-pin grey harness (this is the reverse camera retention harness).
4-pin harness:

6-pin harness:

Here's How You Connect Them:
4-Pin Harness Cable to 6-Pin Grey Harness
12V (Yellow) - 12V (Red)
GND (Black) - GND (Black)
CAM IN (Black) - CAM IN (Purple)


Once you've matched the wires correctly, plug the 6-pin grey harness into the reverse camera input port at the back of your VHEDIA head unit.
Please see this video guide (starting at the 6:00 minute mark):
No Plug From Harness That Fits Factory Reverse Camera Plug
Is your factory reverse camera plug a 4-pin? If yes, check the retention cable with SKU VH-APVT04.
Here's how to wire it:


How To Trim The Fascia To Fit The AC Vents
How to prepare the new fascia:
Remove the old climate-control trim.
Locate the small extension tabs on the new fascia—these cover wider AC vents.
If your vents are full-width snip off those extension tabs with pliers or scissors (as seen on the image below)
Test-fit: the trimmed fascia should slide into place cleanly and clips/bosses should align.

You can also refer to this video guide (starting at the 18:00 mark):
How to Fit the New Fascia
When installing a new head unit for the Toyota Hilux SR5 (2011–2015), it’s essential to properly fit the new fascia. You might encounter issues with the fascia not fitting correctly due to an extra cover on the AC/climate controls section. Follow these steps to resolve this and complete the installation:
1. Identify the Extra Cover
Inspect the new fascia and locate the additional cover on the AC/climate controls section.
This extra cover can prevent the fascia from fitting properly if not removed.

2. Remove the Screws
Using a screwdriver, unscrew the fasteners securing the extra cover to the fascia.
Keep the screws in a safe place in case they are needed later.

3. Detach the Extra Cover
Once the screws are removed, gently lift and detach the extra cover.
Ensure the area is clean and free of obstructions before proceeding.
4. Fit the New Fascia
Align the new fascia with the dashboard, ensuring it fits snugly without gaps.
Need further assistance? Reach us out on our support channels:
Live Chat on our website (https://vhedia.com.au/): Mon–Fri, 7 AM–5 PM (Perth time)
Phone Support: 1800 577 415, Mon–Fri, 7 AM–3 PM (Perth time)
Email: hey@vhedia.com.au