
This guide will walk you through installation notes, troubleshooting tips, and special features for installing your VHEDIA head unit into a Toyota Prado 2017–2023 (All Badges).
Installation Video
Which Wire Goes Where


Common Issues & Fixes
No Sound After Installation
If your unit powers on but no sound is heard:
Go to Settings > Car Settings.
Enter Factory Settings (passcode: 126).
Navigate to CANBUS > Advanced.
Manufacturer: Simple
Category: Toyota
Model: Prado 2018 (works for all Prado models)
Tap OK.
If using M Series (MT-1007VX) → skip to Step 6.
Return to the home screen and open the Amplifier app.
Adjust the volume and see if it sound now works.

Knob/Dial Does Not Flick Back
Pull off the knob and test the metal spindle underneath.
If it works fine, contact us at hey@vhedia.com.au and we’ll send a replacement knob.
If the replacement also doesn’t work, contact us again for further support.
Car Stuck in Reverse
Unplug the two cables labelled “REVERSE IN”.
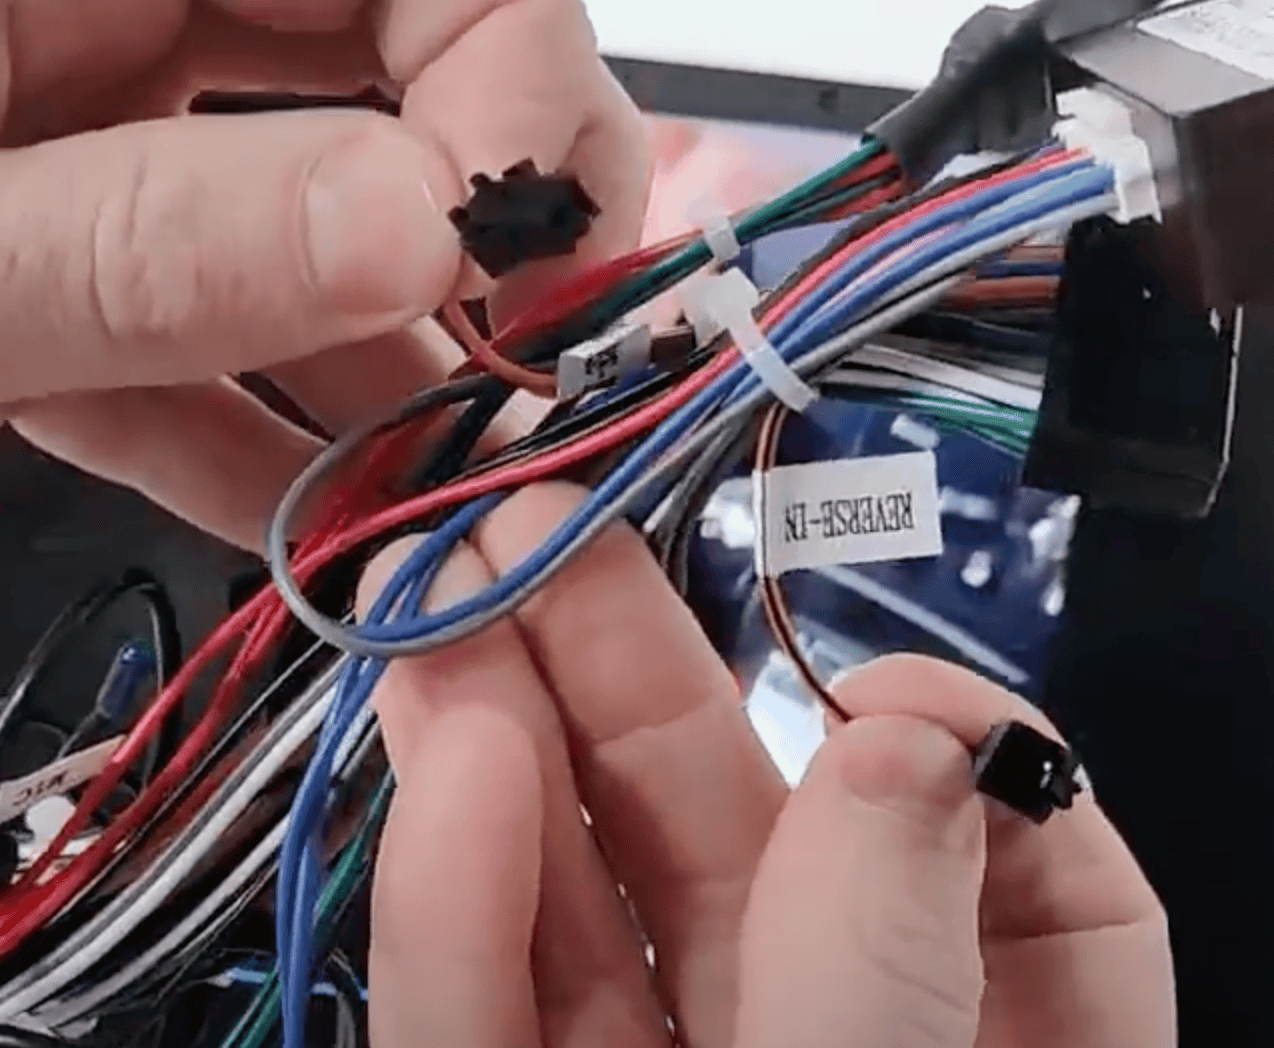
This should resolve the issue.
Factory Camera Settings
Factory Camera – Static Display
If the camera works but the screen shows static:
Go to Settings > Car Infotainment > About Device > Fill in password 8878 > Backcar Setup.
Cam Type, select (0 CVBS) > CamFormat, select (1: NTSC or 2: PAL) choose the one based on what your factory camera uses but majority uses NTSC.
Tap SAVE > OK to reboot.
Your reverse camera should start working after the reboot.
Front Camera No Longer Shows When Shifting to Drive or Slowing Down
Follow the step-by-step video guides below.
First Step:
Second Step:
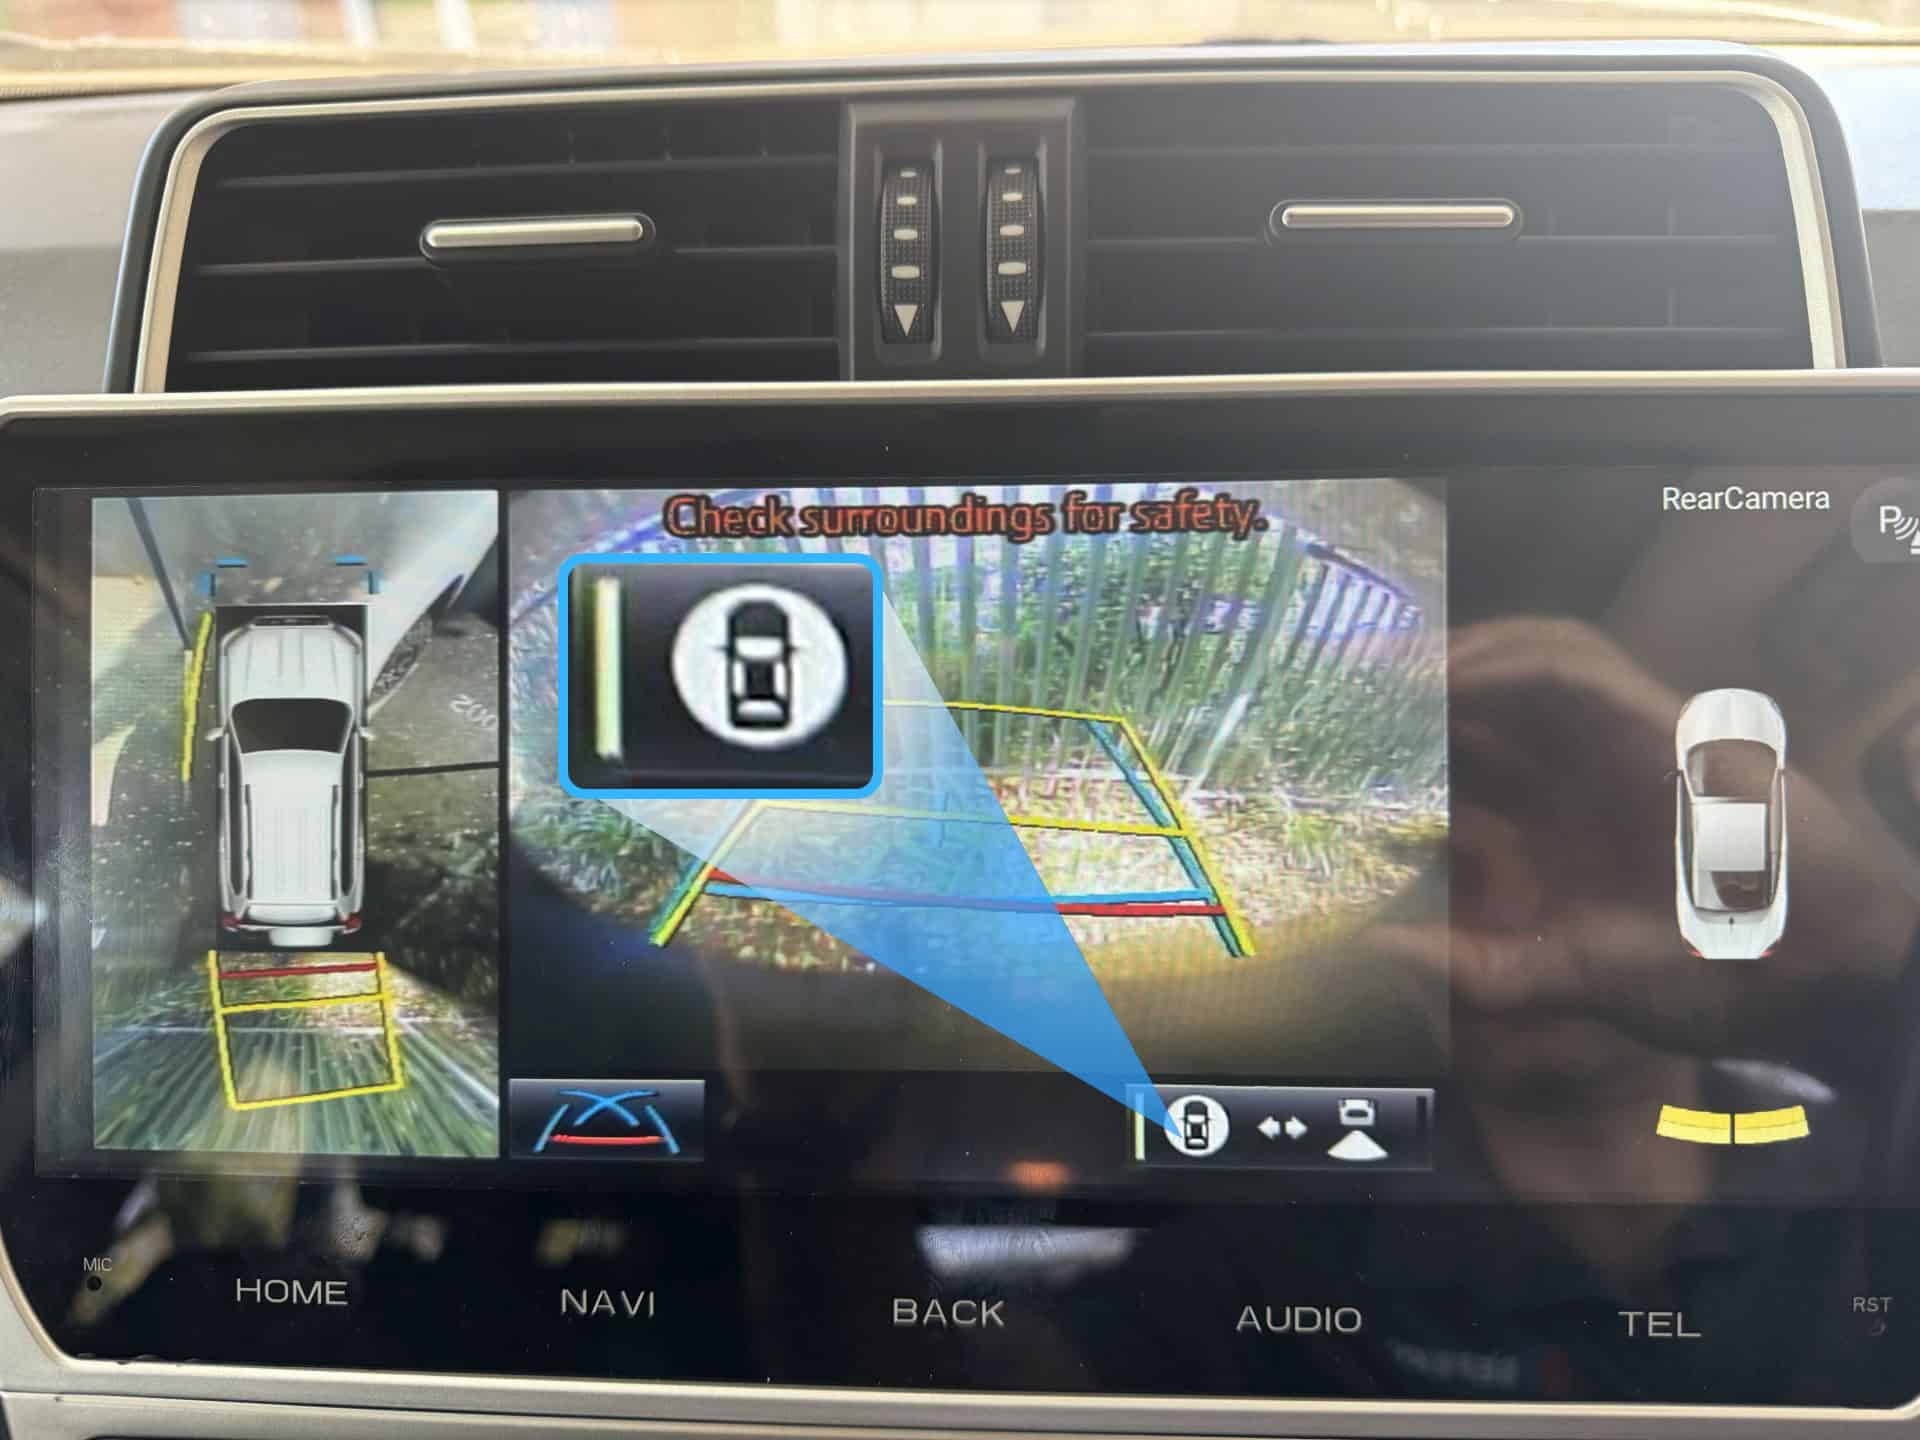
How to Enable the 360 Camera
Follow these steps to enable the 360 camera on your Toyota Prado's head unit:
1. Access the Menu:
Turn on your vehicle and ensure the head unit is powered up.
Go to Settings > Car Infotainment > About Device > 8878 Password > Menu Icon.
2. Enable 360 View:
In the menu, find and select the 360 View option. This setting enables the 360-degree camera functionality on your head unit. (Refer to the image below for guidance).

3. Activate the 360 Camera:
Put your vehicle in reverse to engage the reverse camera.
On the reverse camera display, locate and click the 360 Icon. This will switch the view to show the 360-degree camera perspective. (Refer to the image below)
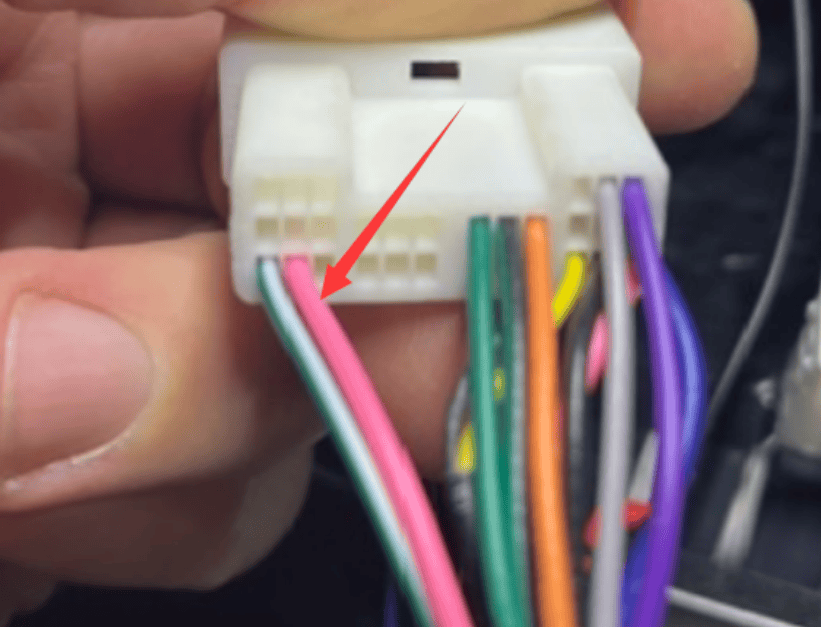
Hand or Parking Brake Light Staying On
If you are experiencing an issue where the parking or handbrake light stays on continuously on the dashboard, follow these steps to resolve it. This involves cutting or pulling out the pink wire from the included harness of the head unit.
1. Locate the Pink Wire
Identify the harness included with your VHEDIA head unit. The pink wire should be clearly visible within this harness.
2. Choose Your Method
Cut the Wire:
Using a wire cutter, carefully cut the pink wire. Ensure the cut is clean and there are no loose strands.
Secure the ends of the cut wire with electrical tape or a wire cap to prevent any short circuits or unintended connections.
Pull Out the Wire:
Firmly but gently pull the pink wire out of the harness. Ensure it is fully disconnected from the rest of the wiring.
3. Test the Fix
Start the car and check the dashboard to ensure the hand or parking brake light is now functioning correctly and does not stay on.
4. Install the Head Unit
Once everything is done and checked that all plugs have been put correctly, sit the head unit and the AC controls in place and piece everything back together.
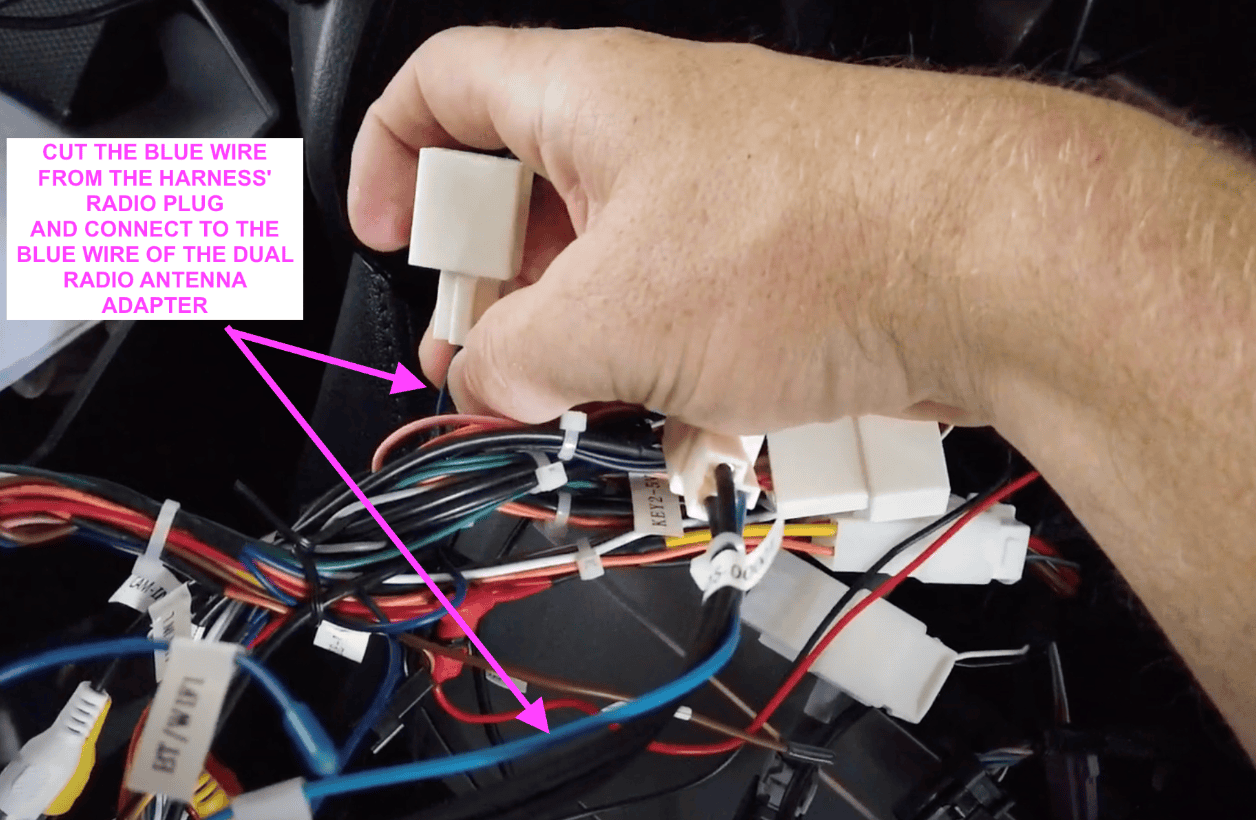
Factory AM/FM Radio Quality Issue
This guide provides instructions for installing the Toyota Dual Radio Plug.
When you receive our kit, you'll find a dual radio plug adapter included. This component is designed to enhance radio reception in our head unit. While in the future, all our harnesses will come equipped with the dual one, if what you have in our cable harness is a single one, follow these instructions for optimal performance.
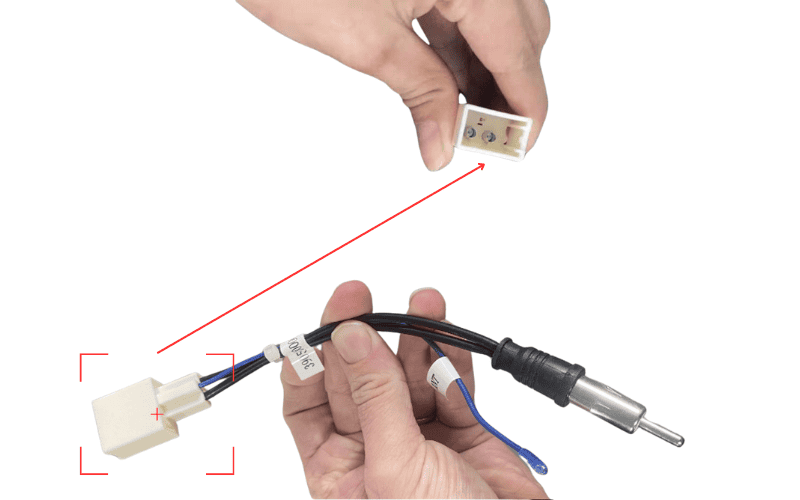
Wiring Diagram:

Installation Steps:
Verify Compatibility
Before proceeding, ensure that the Toyota Dual Radio Plug is compatible with your vehicle's factory radio. If uncertain, check the factory radio plug or reach out to us for assistance.
Preparation
If you have the dual radio plug adapter separate from the harness, you'll need to integrate it to the radio plug on our harness for improved reception.
Locate the blue wire from the radio plug of our harness.
Cut the blue wire.
Connect the blue wire from the dual one to the cut end of the old blue wire you just cut.
5. You're done! Test the radio and should be as good as the factory one.
Toyota QC3.0 USB Panel
Your VHEDIA kit includes a QC3.0 USB panel that fits flush in the dash for cleaner access.
Connection options:
Plug & Play Method:
White plug connects directly to the factory cigarette lighter plug (piggyback cable).
Manual Wiring Method:
Snip plug, connect Red wire to ACC power, and Black wire to GND at the head unit.
Below is what the plugs from the Toyota QC3.0 USB Panel looks like:

Need further assistance? Reach us out on our support channels:
Live Chat on our website (https://vhedia.com.au/): Mon–Fri, 7 AM–5 PM (Perth time)
Phone Support: 1800 577 415, Mon–Fri, 7 AM–3 PM (Perth time)
Email: hey@vhedia.com.au